


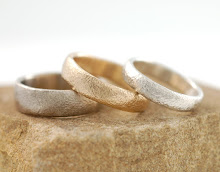
I love how these turned out. These bands are really some of my favorites, so simple and silky smooth. I was so happy to be able to make them in yellow gold.
Available on
Zibbet
Etsy
Artfire
What's New!
2 weeks ago


 Posts
All Comments
Posts
All Comments


I just got this book the other day and am super excited about it. When most of my casting was pretty straightforward - it was easy! I went years and never had a casting not turn out. However, as I've progressed and started experimenting - I try risky things that I haven't done before and often come up a little short. There is a great troubleshooting section which is just what I need! Its not a huge book, only 116 pages, but I can tell it is going to be a fabulous resource. It has a lot of info other books I have don't cover and one aspect I particularly like is that it is a collection of articles from different authors. You can check it out on Amazon, or the next time you place your Rio Grande order, they have it too.
Finally I've gotten all my photos together to do a photographic tutorial of lost wax casting.
All of my waxes are made individually. I really enjoy working with brown wax the most. I've used hard waxes for somethings when needed, but they aren't my favorites. I've also used some red and pink wax that a friend uses in dental wax work. I've made several of my own tools - very easy to do. my favorites are small needles stuck in the end of a pencil eraser.
These are the beginnings of some of my flower rings and starting to sprue them up.
Spruing allows the wax to melt out of the mold and for the metal to get to your piece! not having enough sprues or having them in the proper location can cause your piece to not turn out.
After all sprues have been attached its now time to weigh them. This if very important and is often forgotten. The weight of the wax is used to determine how much metal you will need for the casting. Because each metal has a unique specific gravity - you will need to know what number to multiply your wax weight by. For sterling, you can do it two ways - you can multiply by 10.4 and then add a half ozt (troy ounce) or you can simply multiply by 15. I usually do both to be on the safe side and figure something in the middle. For very small or very large, using teh 10.4 and half ozt is usually best.
After the waxes are weighed, its time to attach them to the sprue base or button.
Then the flask is lowered over the waxes. It is important that there is at least 1/4" of space between the edge of the flask and the waxes. Now believe me, I've pushed it and nothing bad has happened, but that doesn't mean that it won't. You can have a blow out where the hot molten metal breaks through because there was not enough investment. Same with the top of the flask, if the wax is too close to the top, the metal can break right through. And for vacuum casting, this could be very bad as the metal would most likely damage your casting table.
now you are ready to invest!
You need to know the size of your flask and how much investment you will need. For this sweet little flask, I only need a 1/2lb and 3.5oz of water. Measure the water out first and pour it in the rubber mixing bowl.
Now weigh out the investment. Investment contains silica - so you should wear a dust mask if you don't have exhaust. I got this cute blue scale for very cheap - and its blue! no need to spend big bucks on an expensive scale - it just needs to work.
Set the timer for 8 minutes. This is the longest that your investment should be disturbed. Once it starts setting up, you don't want to be messing with it. I start the timer and then pour the investment in to the water. Mix for 3 minutes - right when it turns to 5 min, its time to vacuum.
Vacuum the investment for 2 min - this is the first step in vacuuming.
Bubbles are good - this is the vacuum getting all the air out of the investment
Now, pour the investment in to the flask. Its a good idea to have tape around the top of your flask to keep the investment from bubbling over and making a huge mess. When pouring, pour down the edge of the flask, not directly on the waxes as it could cause the wax to move slightly and perhaps against another wax or too close to the edge.
Now for the vacuuming of the flask! If you are vacuuming more than one flask of the same size, make sure to mark them. I use a piece of chalk to write a number corresponding to the wax weights - the chalk doesn't burn off in the kiln so its easy to distinguish when getting them quickly.
This removes air that might have been trapped around the waxes and still in the investment from pouring - vacuum for approx 1.5 minutes - don't go over your 8 minutes.
It bubbles up and over like an ancient tar pit! The rings were pretty small in this flask, so I didn't fill it up all the way to reduce the bubbling over.
If there was a little bit of investment left over, after the time is up, pour the little bit on top. With vacuum casting, you need to leave at least 1/8 of an inch at the top to aid in the suction during the casting. if doing centrifugal casting, it can go over the top of the flask.
now it needs to sit for about 10 - 15 undisturbed until it sets up, then it needs to sit for about 1.5 - 2 hours before you can start the burnout process in the kiln.
Once the flask is ready - it goes in the kiln and starts the burnout process. Burnout times are anywhere from 5 - 12 hours. The 5 hour burnout is perfect for just doing a couple of small flasks. Since I'm just a small time operation and didn't have the extra $900 to spend on an automated system, I have to manually adjust the temperatures to make sure the burnout process moves along smoothly. Hour 1: 300 degrees, Hour 2: 700 degrees, Hour 3 and 4: 1350 degrees, Hour 5: 1000 degrees - and hold.
Once the kiln has been holding at 1000 degrees for an hour, its time to start heating up the crucible and the metal. Make sure the crucible is red hot before adding the metal.
Once the metal has melted, give it a pinch of flux, a stir with a carbon stirring rod (and make sure to heat it up first or the metal will stick to it)
Note the hands free set up I made with some nice fire bricks!
Now with my hands free, I can get the flask out of the kiln. Make sure to check to see that the pathways are clear - if burning out natural material, some ashes might be stuck. You can check it before you start melting the metal if you think there might be an issue you'd need to clear up, otherwise, a quick check on the way to the casting table is just fine. Also note the giant fireproof glove. I wish they made them in smaller sizes!
Place the flask upside down on the casting table (same as investing table, just make sure the toggle switch is flipped to "Cast") with the holes facing up. Turn on the vacuum pump.
Position the crucible over the flask - make to always keep the torch on the metal. Removing the torch can cause oxygen to get in and that is bad.
As you are pouring, keep the torch on the metal and pour quickly. Pouring too slowly or moving the torch can cause the metal to freeze up and your casting won't work
Once the metal is poured, turn off the torch and the vacuum pump. Release the vacuum by flipping the toggle off of cast and move the flask away to let it cool. Wait until the metal is no longer red hot. I check it under a dark area of the table before quenching.
Now that the metal has cooled a bit and is no longer red (generally 2 - 5 minutes) it is time to quench. Make sure the flask is completely under the water. You want it to all be bubbling completely underneath the surface of the water. If you have used cast in place stones or some alloys you don't want to quench when the metal is hot. You need to let some completely cool up to an hour so as to not crack the stones or cause the metal to be shocked. Regular sterling is fine to quench after a few minutes.
These castings have been scrubbed clean of most of the investment, but there are still bits around the sprues and in the creases of the flower
Soaking them in vinegar is a great inexpensive way to remove the investment and to clean the metal! I often leave them in there over night or longer depending on small detail areas. And its nice to have the metal clean already! It does take longer than an ultrasonic cleaner, but if you don't have the money or the space, vinegar works just fine.
And now its time to clean them up! removing the sprues, grinding, filing, sanding, adding texture to camouflage where the sprue had been, adding a patina, and the final polish all await your piece!

![[Most Recent Quotes from www.kitco.com]](https://lh3.googleusercontent.com/blogger_img_proxy/AEn0k_sORSfdK0wHAYDfnVgx7rC4ip-6S4V7YkUUcedTP1h6YsBq87RRtadRzylepCh16eyJH1TA-3fxlpuEg-nzzvc11Pp1gGZWl7f7vxkezi0ex_Azza0=s0-d)


