Showing posts with label sterling silver. Show all posts

Monday, March 14, 2011

10 year silver prices...


I started working with silver 10 years ago. At the time I was in school and it seemed expensive in comparison to copper and brass - the really cheap metals.

Looking at the 10 year chart makes me sigh.... wow. I didn't know how fortunate I was. Even 5 years ago it was about the same. now.... I'm kind of speechless.

Thursday, August 19, 2010

Cuff Links!


I hadn't made cuff links before - and had a custom order for some. I am so happy with how these turned out! And I've totally fallen in love with the format of a cuff link. I'd been hesitant about making any as I've never worn them, nor do I know any men that wear them - I guess I'm sheltered?! But now that I have, I'm totally looking forward to making some more.

If any cuff link wearers have any tips for things they like or don't like - I'd love some opinions!

Wednesday, June 2, 2010

Where I've been and Where I'm going....


So this title sounds a bit more 'deep thinking' than its really meant to be, but it might be fitting!

I've been really busy that last two weeks wrapping up all the custom orders for any June/early July weddings. I will be taking two weeks away from the studio for a yoga teacher training course starting on June 5th. I will be back in the studio on June 21st - but during that time, I will not be making any jewelry! I'm pretty excited on many levels.

The photos are all the rings I made in the last week and a half - it was a HUGE push - which is why I haven't been around here much! I wanted to make sure everything got done that needed to be done. I got them all finished and then some. There are a few more rings I'll be finishing up today that aren't in the photos - though I think they may deserve their own photo finishes. :)

I'm also really excited to be embarking on my yoga teacher training journey. The first session is 2 weeks this summer. The second session will be in January of 2011. I haven't been this excited about something in a long time... well, I don't know about that. I'm a pretty excitable person. But this does feel different in terms of it being a major life changing experience. I'm debating blogging about it over the next two weeks. If not during, I definitely will after it is all over.

I'm very interested to see how it affects my jewelry as well. I haven't taken a two week break, well, since I started my business full time in 2006.

Oh, and I'm getting my hair all chopped off. Big Changes! I'll post some before and after photos :)

Thursday, December 10, 2009

New Release Thursday!


1. organic vine ring w/ copper and gold, 2. organic vine earrings w/ patina, 3. organic vine pendant, small w/ copper and patina, 4. vine ring - wide version, 5. small organic vine pendant w/ copper leaves, 6. 3mm tree bark ring, 7. organic vine earrings w/ copper, 8. organic vine pendant w/ copper and gold

So I know I am running a little bit late this year in listing a whole bunch of new work, but better late than never I guess! Some things I'll be listing the next couple of days aren't really new at at all. In fact, some pieces are quite old, but I just never photographed them! This is just a small sampling of the many many pieces that I'll be getting up on Etsy - all one of a kind and ready to ship! Make sure to keep an eye on my Etsy shop, you never know when something you want will pop up!

Friday, October 16, 2009

EMJC-PR6.8 - Wedding Challenge


So this week was a little interesting for me since pretty much all I do is make wedding rings, and some other wedding jewelry every once in awhile - so in a way it wasn't as fun of a challenge for me - but I still wanted to try to push myself in a little bit different direction than usual. I called this my "Eclectic Bride". I was inspired by working w/ a recent client. Long story short - she sent me several links of items she liked. In my head - I mixed them all up and created this necklace! Every week I seem to find something new to add to the already existing motifs I'm trying to stick with. This is the first time I've added the gold balls to the organic vine pieces and I LOVE it. I also opted for the patina this week - it added to the 'eclectic' feel. Some sections I left the patina on full strength and others I cleaned most of it off. I think a little bit of patina helps the gold to stand out more.

Another thing that is fun about these challenges - I do hold myself to the deadline (I went a few minutes over today on my photographing due to a phone call that caught me right at the end!) so there are some finishing things that I think I'll tweak later, but I wanted to remain true to the deadline and get it photographed as is at 3:00.

And now for the blog post. whew - its been a busy day and I have lots more to do - so I'm out!


Thursday, October 1, 2009

Finishing up custom orders

I've been busily trying to get caught up, of course, I think that probably my usual state, so nothing new! Just wanted to post some photos of the most recently finished custom variations.

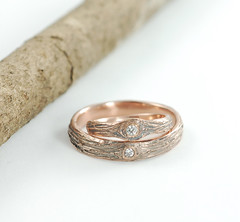
Rose Gold with patina and Diamonds (100% recycled metal + conflict free diamonds)

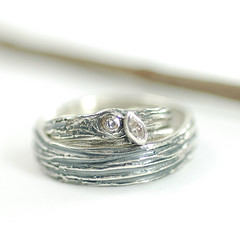
Sterling silver and Diamonds

Sterling silver with champagne and white diamonds

Friday, September 4, 2009

EMJC-PR6.2 - "Pregnancy"


EMJC-PR6.2
Originally uploaded by bcyrjewelry
All finished finally w/ the 2nd challenge.
This one was rather interesting - a pregnancy challenge. For the show - designing clothes for a pregnant belly is much different - so the interpretation really opened up a lot more for jewelry. A lot of us were really inspired by Malvin's interpretation, which though he got kicked off, was the most artistic interpretation of the theme.

My piece is fused sterling silver - my organic vine pattern that I created a 'ball' out of. It also reminds me of a birdcage. I filled it with these gorgeous yellow flowers - 4 o'clocks. They don't bloom during most of the day and when they are closed up, the rather look like scrambled eggs - or just plain scrambled egg yolks.

The chain is all handmade fused argentium sterling silver also. There is no clasp - so it is super easy to just slide right over your head! A little symbolism w/ a little practicality.

Tuesday, September 1, 2009

Comparison - sterling, 14k palladium white gold, 14k yellow gold


comparison
Originally uploaded by bcyrjewelry
I've been meaning to post this here for awhile, and today is the day!
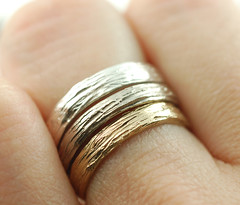
Just wanted to show the comparison in color of the 3 metals I use most. These are shown without the patina, but give for better comparison of the true colors.

Wednesday, July 22, 2009

Subtlety - New Wedding Bands


Subtlety
Originally uploaded by bcyrjewelry
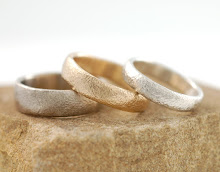
When I was first learning to cast, I remember my teacher specifically saying not to cast something that can be fabricated more easily. When I was thinking of making these rings, that was all I could think about. Was it worth casting these when they are really just simple bands? The more I thought about them and looked around at other "simple" sterling bands, the more I realized that they are different and they are worth casting. It's subtle, hence the name.

The edges are soft and there is a very slight 'texture' that can only be achieved through the soft wax that I use. They are silky and satiny looking to me. And oddly, were hard to focus on as there seemed to be no hard edge the autofocus could land on! There is something about these that make me really happy. They are almost calming. A customer said it reminded her of a pool of water. They kind of remind me of a gentle breeze... maybe blowing over a pool of water.


You can see the listing on Etsy or Artfire.

Thursday, July 9, 2009

ant hill garnet and palladium white gold w/ patina

so things have been really busy - as you might have noticed in my lack of posting. I am finally starting to feel like I'm getting caught up. I still have.... well, a lot of work to do, but I've gotten over that hump of feeling completely overwhelmed. I opened my Etsy shop back up - I had decided to close it for a few days to give myself some breathing room. It really helped! Yesterday I completed some important projects I had been working on. This set included - the first tube setting in palladium white gold. I've done tube settings before, though just using ones that had been purchased. Since you can't buy tube settings in palladium white gold, I knew I had to make my own. And since the tubing existed - I figured I could do it. I had to do a practice one in sterling first and I think it turned out pretty fabulous!
sterling and tube set amethyst
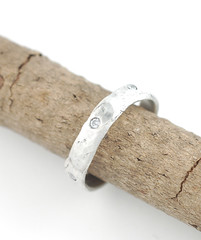
Though oddly enough - I am finding that flush setting is easier for me. I was scared of it for so long and now when I have an extra few minutes I drill a hole in a discarded ring and throw a stone in just for extra practice! It revamps the ring and gives me more confidence in offering it to customers.
sterling and flush set champagne diamond


So, yup, I'm still really busy, but going to try to come back to a more balanced work load that includes at least a couple of blog posts a week!

Tuesday, June 16, 2009

flush set practice - reclaimed sterling and diamond ring - w/ patina

Out of need I finally did my first flush set a couple weeks ago. It turned out amazingly easier than I thought it would be. I wondered if it was a fluke though. It was a ring that I had cast the diamond in place - the diamond got a little burned, so I smashed it out and decided instead of redoing the whole ring, I would attempt to set the stone first. It worked great!.

I did a second one a couple days ago. Same situation - a ring that had two stones cast in place - one was PERFECT. The other... split down the middle and the metal cast through the stone. And the color of the stone changed. It was so weird. I smashed the damaged one out and and set another to match the one cast in place. I was extremely pleased and you can hardly tell any difference. (and if you are wondering how I am doing this smashing, a nail or chasing tool and a hammer. works great and is actually very fun)

So, after the two 'out of need' setting situations - I decided to do a few intentionally. Which meant practicing on a ring that was just hanging around - I 'reclaimed' it (filed, hammered, made it lovely and tough looking) and then decided i might as well set 3. In my attempt to unevenly space them - they ended up being a little more even than I had planned. Which I find very ironic - though its hard to photograph it so you can see all three at the same time.

I was really happy w/ how it turned out. I photographed it with a heavy patina, and w/ just a light patina - since it was practice, i figured I might as play w/ it.

Its not perfect, but thats why its called practice! I do have to say that my friends, Sara and Clare have been a big inspiration with their lovely flush settings. I've been putting it off for a long time as any time I read tutorials, it just seemed extraordinarily difficult. Once again, reminding me that just working it out on my own is a better way for me to learn that trying to actually follow instructions. Reading the instructions was good - but then forgetting half of them and just winging it is what works best for me!

I love the setting, all tucked away and kind of hidden in the metal - not sticking up or getting in the way. I love the action of the setting too, using the metal of the ring to hold the stone in. I love the look of casting them in place, like the metal grew around the stone, but these are a close second... if not a tie!

Friday, June 5, 2009

Signature Style - EtsyMetal Blog Carnival

This is the second installment of the Etsymetal blog 'carnival'. The idea is that we'll pick a topic every so often and anyone that wants to will blog about that one topic - then we'll all link to each other so you can see the answer from other EtsyMetal members.

The topic or question for this one is about our signature style and how it came about or was inspired.

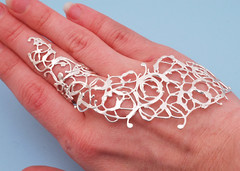
Mine pretty easily came to mind as I remember the course it took. Though I feel I sort of have 2 signature styles, I'm picking just one - my Organic Vine Collection - It all started w/ this pendant.

I was still very new to etsy and it was the first thing that sold the same day I listed it. Within a couple of hours even it had sold. That said to me "This is unique and desirable and eye-catching" It was also extremely fun to make - its all about fusing - my favorite thing - using a torch AND hammering.

It evolved in to the more current style pretty quickly once I found how easily Argentium sterling silver fused. This necklace was one of the first of the recent generation of the Organic Vine Collection.


I knew that I wanted to find something that would create a style and a look that was easily recognizable, but did not involve making the same piece over and over and over again. So I developed this collection. It is always fun to make, the pieces never turn out the same and I know that all of my customers are getting something truly unique.

As far as the inspiration for the name of the collection - it reminded me of vines obviously! particularly vines that grow up and over fences, gates, walls, etc... nature taking over.


I want to continue to evolve the collection. I have visions of what sort of pieces I can create. I want to do some body formed pieces - similar to this ring. But on an even larger scale.


So that is where it came from and where I hope to be going! And make sure to check out the other EtsyMetal participants for this topic:
cynthiadelgiudice.blogspot.com/
andescruz.ganoksin.com/blogs
andescruz.wordpress.com
daniellemillerjewelry.blogspot.com/
sarawestermark.blogspot.com/
etsymetal.blogspot.com/
ashleyakers.blogspot.com
tangerinetreehouse.blogspot.com
ninagibsondesigns.blogspot.com/
discomedusa.typepad.com/
kerinrose.blogspot.com

Wednesday, June 3, 2009

new organic vine rings


new organic vine rings
Originally uploaded by bcyrjewelry
I needed to remake a ring for a sweet gal and since it had been awhile since I had made one like it, I wanted to do a couple of 'practice' rings. I've been wanting to make some wider organic vine rings w/ stones for awhile and this was the perfect chance! I haven't listed them yet... hopefully later today - this is just a little tease. And there is another photo on flickr of the other ring - slightly different (of course) and w/ lapis. They are fused argentium sterling silver - though the fine silver bezel is soldered in (and intentionally made uneven for a truly organic look). oh and this stone is aventurine - one of my favorites.

Friday, May 29, 2009

New Setting!!

I am so incredibly excited about this. You know how sometimes you think about something too much and it turns it in to a huge seemingly insurmountable task. Well, finally, I worked on this design and it was a million times easier than what I had built it up in my head to be. I'm not sure why I thought it would be so difficult. Or maybe all that 'thinking' worked it out in my head so that finally when my hands got to it, they'd been mentally practicing for months? can that happen?!

I really like casting the diamonds in place b/c it gives a really nice and subtle look - but this is definitely a close second! I used a gold tube setting - well, b/c it was what I had, but also I really like the combo of mixed metals.

The excitement of finally creating this setting is that now I can do any kind of stone someone might want! Before, I was limited to diamonds, rubies and sapphires - or synthetic stones. And those don't even turn out every time they are fired (I'm working on that too though).

This ring had actually been a 'mistake' - and had a diamond in it that hadn't turned out. so I unearthed the damaged diamond, drilled a hole the setting would fit in to and soldered it in place. And lucky for me, its just my size! Sometimes I like to keep the prototype of something - it helps me remember what I did, where I've come from and how I can improve.

I hope today is as wonderful and successful of a day (for you too!).

Monday, May 11, 2009

700 yr old French Coin Pendant Finished!!!

I have been working on the project for far longer than I anticipated. Once I got into it, it went along fairly nicely. But I was simply frozen with fear for a long time and felt like I had something that was in no way replaceable.

Thanks to my dear friend Sophie - she suggested the solution I was looking for. Though I don't remember exactly what was said - the basic idea is hers! I used 3 layers - the middle layer was the same thickness as the thickest part of the coin - which was 21g - most of the coin was much less than that, but I didn't want to be riveting the two sandwich pieces and putting pressure on any part of the coin. I also didn't want to be working on the metal of the pendant after it was all riveted together. So for me, getting the outer edges to all be perfectly the same was a little challenging at first. The rubber cement would only last for so long - I think the heat was making it melt?! Is that possible? Or maybe just the pressure of me holding it so tightly was causing the slices to slip. Once I got the outer shape close - enough, I used some bent 'rivets' to hold the 3 slices just right as a ground and sanded and filed away. Why you ask didn't I just cut all three out at the same time? Well... thats a good question. And I don't know that I have a good answer. If I did it all over again, I probably would have done some things differently.

But, I am very happy with how it turned out. The coin is somewhat protected as it won't lay against the skin in either direction. It is reversible, so the back and the front are equally 'open'. The metal has a nice old feel to it, w/o competing too much with the coin. I also worked on having the overall shape be fairly organic and look as if it could have possibly been around for awhile too. And because of the cold connections, the coin could at some point be taken out and the setting redone with no harm to the coin. Though as another friend mentioned - if it has lasted for 700 years, its probably pretty tough!

Oh and why three rivets? The father, the son and the holy spirit of course! I figured the old French monk would have wanted it that way. And to give further credit where credit is due - another friend mentioned I should add further significance to the piece by choosing an number of rivets that would have meant something. And for a small pendant, this seemed the most logical.

So thats it. Its finished. And I honestly don't think I could be any happier with it! A few more photos can be seen on flickr.

Wednesday, April 22, 2009

And the Winner Is....


...Morgan from Let Me Help You Help Me!!

Congrats Morgan and thank you for entering and being so excited and enthusiastic! They are on their way to you now! Enjoy!!

Tuesday, April 21, 2009

GiveAway Ends Today!!!

Just a reminder - today is the last day for a chance to win a pair of my earrings!
Find out more on Down and Out Chic.

Friday, April 17, 2009

Earring Giveaway!


My sweet friend over at Down and Out Chic asked me if I was interested in doing a promotion on her blog and I said "Yes!" Though I'm not much of a daily blog reader - I do read hers every day! Not only is she an amazing person, but she has great taste. I love seeing what she has found that is unique, gorgeous and affordable!

So anyway, go check out her blog and participate in the promotion to win this pair of earrings! Ends 4/21.

Thursday, March 26, 2009

Rough Ruby Knot


Rough Ruby Knot and sterling
Originally uploaded by bcyrjewelry
Its an idea I've had rolling around for awhile, to get some rough diamonds rubies and sapphires to cast in place as my 'knots' And I finally got some to play with! This is the ruby version. It was one of my favorite of all the batch that I got and thought it looked perfect like a gnarled tree knot! Though I love working on custom orders, it was really fun to just make something that I've been wanting to do. Though I did make it in a size I couldn't wear! You can see the listing here and the green sapphire version here.

Thursday, February 26, 2009

New organic vine cuff bracelet


organic vine cuff bracelet
Originally uploaded by bcyrjewelry
I took some time off of making these, worked on revamping them and am very pleased with the results! They are sturdy and strong and elegant all at the same time! I've been making some that are larger and also working on a bangle version - which is quite difficult to achieve, thought its getting there!

You can check it out here.