Wednesday, June 24, 2009

Busy-Ness and Athfest


photo courtesy of Athfest
Hello All!
My blog will be taking a little vacation as I am busy busy busy getting ready for Athfest this weekend. And then while I am at Athfest, all 30 hours, I surely won't be on the computer either.

If you are in Athens, stop by to see me!!! I'll be in front of the Morton Theatre!

Monday, June 22, 2009

'Gator Skin - not the real kind


I love this stuff. I only got it recently, but have quickly found that it that it helps to protect my fingers in just the way I need. I was hesitant about getting it because I really like to be able to 'feel' everything. It took a little experimenting to find what was most comfortable for me - wrapped enough to protect, but not too much to lose all sensation. I use it mostly when I am finishing up ring castings. Its great for gripping when sawing off sprues. Its nice to know that if I slip, my naked finger won't get cut, and the slight stickiness of the 'gator skin help to hold on to the ring as well.

When I'm finishing the insides of the rings, they quickly heat up. At least with my fingers a little protected, I can grind/sand/polish for longer before I have to move on to a second ring to let the first one cool down. Not only are my little fingers protected from cuts and burns, it also helps save some time! Before I used it, at the end of a finishing day my fingers would be so sensitive from essentially being slowly burned for hours. Now they are just fine! I've seen photos where they wrap it all the way down past the top two knuckles. I didn't like that as much, so I just make little finger tips. That way I can easily slide them off if I need to. I got mine from Rio Grande, and Gesswein carries it too.

Thursday, June 18, 2009

Digital Calipers

**I posted this review on the EtsyMetal blog - but just in case I have some readers here that don't follow that blog - I wanted to post it here too! Because, really, these are one of the best tools I've gotten in a long time.


I recently got these calipers and love them! Before, I only had the simple little brass ones - which are no good for measuring anything specific, only if you want a 'close' measurement.

A friend of mine had gotten some recently and mentioned how much she loved them. I decided to get a somewhat mid-ranged version. Though I found the selection rather strange. Several were in the $27 - $34 range. The one I got was $45 and then the expensive ones were $169. Quite a big jump! I can't say I really had a lot to go on when trying to decide between the different ones. But I am very happy with the one I did get. I really don't know how I lived with it!

It measures both outer diameter


and inner diameter


and you can convert the measurement from mm, to inches in either a decimal or fraction.

So far in the short time I've had it, I've used it to measure settings, stones, drill bits and burs. Maybe b/c I'm not THE most organized, finding the right size bur is just a guessing game most of the time. Now I can whip these out of their handy case and know the exact size! And yes, the come in their own nice blue case, a battery to get you started and an extra battery! You don't actually have to turn it on, just open them and it automatically turns on. It might have an automatic shut off, though I haven't tried leaving them on long enough to find out. (I'm sure they came with instructions, I rarely bother reading them unless I need to!)


If you do any stone setting, these are a big time saver. Even if you don't do much stone setting, I'm sure once you have these, you will find things to measure just for fun! I ordered mine from Rio Grande. Though I'm pretty sure Lowe's and hardware type stores carry some as well.

Tuesday, June 16, 2009

flush set practice - reclaimed sterling and diamond ring - w/ patina

Out of need I finally did my first flush set a couple weeks ago. It turned out amazingly easier than I thought it would be. I wondered if it was a fluke though. It was a ring that I had cast the diamond in place - the diamond got a little burned, so I smashed it out and decided instead of redoing the whole ring, I would attempt to set the stone first. It worked great!.

I did a second one a couple days ago. Same situation - a ring that had two stones cast in place - one was PERFECT. The other... split down the middle and the metal cast through the stone. And the color of the stone changed. It was so weird. I smashed the damaged one out and and set another to match the one cast in place. I was extremely pleased and you can hardly tell any difference. (and if you are wondering how I am doing this smashing, a nail or chasing tool and a hammer. works great and is actually very fun)

So, after the two 'out of need' setting situations - I decided to do a few intentionally. Which meant practicing on a ring that was just hanging around - I 'reclaimed' it (filed, hammered, made it lovely and tough looking) and then decided i might as well set 3. In my attempt to unevenly space them - they ended up being a little more even than I had planned. Which I find very ironic - though its hard to photograph it so you can see all three at the same time.

I was really happy w/ how it turned out. I photographed it with a heavy patina, and w/ just a light patina - since it was practice, i figured I might as play w/ it.
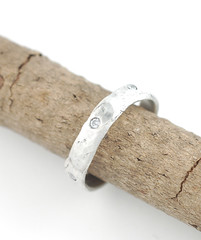
Its not perfect, but thats why its called practice! I do have to say that my friends, Sara and Clare have been a big inspiration with their lovely flush settings. I've been putting it off for a long time as any time I read tutorials, it just seemed extraordinarily difficult. Once again, reminding me that just working it out on my own is a better way for me to learn that trying to actually follow instructions. Reading the instructions was good - but then forgetting half of them and just winging it is what works best for me!

I love the setting, all tucked away and kind of hidden in the metal - not sticking up or getting in the way. I love the action of the setting too, using the metal of the ring to hold the stone in. I love the look of casting them in place, like the metal grew around the stone, but these are a close second... if not a tie!

Sunday, June 14, 2009

In search of my perfect apron

Though until the past few days I've never thought seriously about getting an apron. I usually don't mind wiping my hands on my pants, or whatever I'm wearing. I mean, jewelry making is dirty and I don't wear anything 'good' to work in anyway. Now that it is hot though - my studio is extraordinarily hot and I find myself wearing as little as possible - most of the time a little dress that is cool, but has no pockets. And for a variety of reasons, I am thinking a nice little apron will be perfect. I can wipe dirty stuff all over it and maybe save some of my real clothes from getting incredibly dirty. It has to have pockets - at least one. i don't really know what for, but too often i need something. Also - it has to be an ipod holder. I have a clip on my ipod case, so it can clip to the top of the band if needed - but the arm band holster is just too hot to be strapped on my arm in the 95+ degree heat of my studio. talk about uncomfortable, ugh.

so my qualifications:
*nice colors, something fun that will make me happy
*something thin enough to not be too hot and bulky
*at least one pocket
*not too long - again - we don't want something that will add extra heat
*pliable as I will probably be using it to wipe out the insides of rings after i've sanded them, that sort of thing...
*but - durable enough to deal w/ the dirt of the studio...

so far - here are my favorites (oh and of course, i'm sure you'll notice the blue and green theme - they ARE my colors after all :)


Do you have a favorite? If you know me... does one seem to scream "This is perfect for Beth"? Do you have an apron that you wear and love?

Some people might think that I am indecisive. I know differently - I just like to think it through and find the 'perfect' one for me. Weigh all my options etc. Which is kind of strange considering there are plenty things in life I just do w/o thinking! Hm, I guess when it comes to spending money though - that is what makes me stop and think. And I think all of these are incredibly reasonable priced - so that doesn't actually factor in to my decision at all.

Friday, June 12, 2009

dept of rev update

so - apparently, the password i was using for the past few years wasn't right. i've been accessing my account for the last few years by typing in the wrong password? how does that work?! ha! i would have had to reset it anyway, but since they had it wrong, i 'reset' it to the correct one. where's that little 'emoticon' w/ the rolling eyes when i need it!


**WARNING - RANT AHEAD**
Recently - the good ol' dept of revenue here in georgia is revamping the efiling system. Well, I can't say they've done a very good job of it. The first email I got about the change was before it happened - so I couldn't do anything about at that time. The next email I got was today and I thought, well, I'm going to go ahead and get this figured out.
I followed the instructions to the T. and its not even that they were difficult. They weren't! You just combined your previous user id w/ your state tax id number - and then used your old password from their previous system! and viola! it should get it all set up for you. Nope. It said that either my password or login was not correct. So I tried resetting my password. That portion of the site doesn't seem to be working. I tried signing up like I was a new 'member' (member of a very frustrated club!) and it said that my login was already taken. Really?! maybe thats because its mine!

Unfortunately, I think nothing is working right now and everyone that pays sales tax in the state of Georgia is trying to call - they said at first my call waiting time was 35 minutes. Which is a long time, but I thought, well, I'll just put it on speaker phone and continue grinding on some rings while I'm on hold.

2 HOURS AND 37 MINUTES LATER I'M STILL ON HOLD!? every once in awhile they'll come in and say we estimate your wait time to be at least 35 minutes. or 45 minutes. Gee, thanks. Probably if you would have told me 2 hours and 35 minutes, I would have just hung up!

OMG! they just picked up!!
goodbye!

Thursday, June 11, 2009

etsy front page wedding banner

I was super excited when my EtsyMetal friends let me know that my rings were on the rotating banner on the Etsy front page! Yippeeee!! These sorts of things make me really happy. It took a few hours before I caught it on there, but managed to grab a screenshot!

Wednesday, June 10, 2009

A sweet little thank you...

I love getting a little thank you note from some one and find that sending them is really just as lovely. For me, its easiest to have some sweet little notecards ready to go. It only takes a second to jot a quick note - these are some of my favorites. I sent out a whole batch of the ones from madebykeli just a couple days ago! Thanks Keli - they were just perfect!


Tuesday, June 9, 2009

Review - AJM Guide to Lost-Wax Casting


I just got this book the other day and am super excited about it. When most of my casting was pretty straightforward - it was easy! I went years and never had a casting not turn out. However, as I've progressed and started experimenting - I try risky things that I haven't done before and often come up a little short. There is a great troubleshooting section which is just what I need! Its not a huge book, only 116 pages, but I can tell it is going to be a fabulous resource. It has a lot of info other books I have don't cover and one aspect I particularly like is that it is a collection of articles from different authors. You can check it out on Amazon, or the next time you place your Rio Grande order, they have it too.

Monday, June 8, 2009

engagement ring - remake


engagement ring - remake
Originally uploaded by bcyrjewelry
Normally, it wouldn't seem so difficult to remake an engagement ring - but the original wedding band had been made specifically to go w/ the last engagement ring. And when making the any of the organic vine series pieces, making a duplicate is not easy. Somehow I managed to do a pretty good job and was able to make an organic vine ring to FIT in to the notches from the last one. I don't really know how it worked out, but it did, and I am very thankful! In some ways, I think it might have even fit better than the original! Happy times.

Friday, June 5, 2009

Signature Style - EtsyMetal Blog Carnival

This is the second installment of the Etsymetal blog 'carnival'. The idea is that we'll pick a topic every so often and anyone that wants to will blog about that one topic - then we'll all link to each other so you can see the answer from other EtsyMetal members.

The topic or question for this one is about our signature style and how it came about or was inspired.

Mine pretty easily came to mind as I remember the course it took. Though I feel I sort of have 2 signature styles, I'm picking just one - my Organic Vine Collection - It all started w/ this pendant.

I was still very new to etsy and it was the first thing that sold the same day I listed it. Within a couple of hours even it had sold. That said to me "This is unique and desirable and eye-catching" It was also extremely fun to make - its all about fusing - my favorite thing - using a torch AND hammering.

It evolved in to the more current style pretty quickly once I found how easily Argentium sterling silver fused. This necklace was one of the first of the recent generation of the Organic Vine Collection.


I knew that I wanted to find something that would create a style and a look that was easily recognizable, but did not involve making the same piece over and over and over again. So I developed this collection. It is always fun to make, the pieces never turn out the same and I know that all of my customers are getting something truly unique.

As far as the inspiration for the name of the collection - it reminded me of vines obviously! particularly vines that grow up and over fences, gates, walls, etc... nature taking over.


I want to continue to evolve the collection. I have visions of what sort of pieces I can create. I want to do some body formed pieces - similar to this ring. But on an even larger scale.


So that is where it came from and where I hope to be going! And make sure to check out the other EtsyMetal participants for this topic:
cynthiadelgiudice.blogspot.com/
andescruz.ganoksin.com/blogs
andescruz.wordpress.com
daniellemillerjewelry.blogspot.com/
sarawestermark.blogspot.com/
etsymetal.blogspot.com/
ashleyakers.blogspot.com
tangerinetreehouse.blogspot.com
ninagibsondesigns.blogspot.com/
discomedusa.typepad.com/
kerinrose.blogspot.com

Wednesday, June 3, 2009

new organic vine rings


new organic vine rings
Originally uploaded by bcyrjewelry
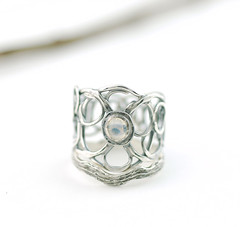
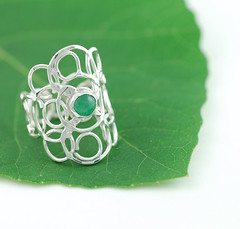
I needed to remake a ring for a sweet gal and since it had been awhile since I had made one like it, I wanted to do a couple of 'practice' rings. I've been wanting to make some wider organic vine rings w/ stones for awhile and this was the perfect chance! I haven't listed them yet... hopefully later today - this is just a little tease. And there is another photo on flickr of the other ring - slightly different (of course) and w/ lapis. They are fused argentium sterling silver - though the fine silver bezel is soldered in (and intentionally made uneven for a truly organic look). oh and this stone is aventurine - one of my favorites.

Tuesday, June 2, 2009

What I'm Listening to: Diego's Umbrella


A new lovely find - first album I've bought after hearing them on pandora radio! They are quite eclectic - some songs I'm not as crazy about - but this one is simply amazing!

Monday, June 1, 2009

new possible photo style??

I've been wrestling with my photographs, well, since I started on Etsy! I have pretty much been in a constant evolution of updating my style, background, etc. I've been pretty consistent recently - but with the addition of more and more wedding rings - which I use a white background for - I had to let go of my obsessive need for making sure the same colors weren't 'touching'. Regardless of the fact that I try to have a very controlled lighting situation - I still get variances in the white - even with the same lighting and same camera settings. I understand the mechanics of why it happens, but it doesn't mean that I like it! (and THIS is why I am much happier I became a jewelry major instead of photography major - but that is a whole other topic!)

So back to my newest idea... Instead of using a green paper background, using a giant leaf on a white background. I can never seem to settle on one single green tone that I like better than others - and the variance in using leaves I think might be just perfect. As there are just some pieces, like my organic vine collection, that just do not turn out on a solid white background. The white would end up looking gray in comparison to my other whites and well, it just wouldn't do justice to the jewelry. I'm going to experiment with some real leaves - this was one lobe of a giant fig leaf - I also have a catalpa leaf I'm pressing. I'm hoping that by pressing them, I can have them last in their green state for much longer. My other option is to look for fake leaves and see if I can find some that might look natural - at least to the camera! Then come winter time, I won't have to worry about my backdrops going away!

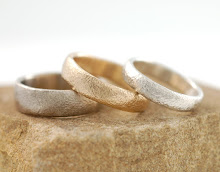
My main concern in getting consistent photographs is that I really want to get my website set up. And I don't want to have totally random photos all together on a nice new website. Maybe I should just start with the wedding rings anyway - as I love how they all look together! The look of the mix of metal and natural materials (sticks and rocks currently) - all I need are leaves and I think the look would be complete. I don't think I'd ever particular stopped to think about what I wanted from my photographs, but I have had several people make comments about them looking peaceful. And I really like that. Its how I feel when I sit in the woods, stare out at a lake or look up at the sky. Peaceful is good.