


I did a second one a couple days ago. Same situation - a ring that had two stones cast in place - one was PERFECT. The other... split down the middle and the metal cast through the stone. And the color of the stone changed. It was so weird. I smashed the damaged one out and and set another to match the one cast in place. I was extremely pleased and you can hardly tell any difference. (and if you are wondering how I am doing this smashing, a nail or chasing tool and a hammer. works great and is actually very fun)
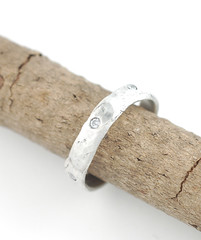
So, after the two 'out of need' setting situations - I decided to do a few intentionally. Which meant practicing on a ring that was just hanging around - I 'reclaimed' it (filed, hammered, made it lovely and tough looking) and then decided i might as well set 3. In my attempt to unevenly space them - they ended up being a little more even than I had planned. Which I find very ironic - though its hard to photograph it so you can see all three at the same time.
I was really happy w/ how it turned out. I photographed it with a heavy patina, and w/ just a light patina - since it was practice, i figured I might as play w/ it.
Its not perfect, but thats why its called practice! I do have to say that my friends, Sara and Clare have been a big inspiration with their lovely flush settings. I've been putting it off for a long time as any time I read tutorials, it just seemed extraordinarily difficult. Once again, reminding me that just working it out on my own is a better way for me to learn that trying to actually follow instructions. Reading the instructions was good - but then forgetting half of them and just winging it is what works best for me!
I love the setting, all tucked away and kind of hidden in the metal - not sticking up or getting in the way. I love the action of the setting too, using the metal of the ring to hold the stone in. I love the look of casting them in place, like the metal grew around the stone, but these are a close second... if not a tie!
![[Most Recent Quotes from www.kitco.com]](http://www.kitconet.com/images/quotes_special.gif)

8 comments:
I LOVE flush settings...but seem to be a spazz at it...these look great!
i love the new setting ~ so many wonderful possibilities now! and i'm also one of those who needs to figure out hands-on how to do something... i just can't follow instructions or tutorials :P
thanks ladies!
Jasmin- I'm so glad to hear that! Sometimes I just think I'm weird that I'd rather just work my way through it. I often can see the 'way' more clearly not reading the directions - which often just confuse me.
These are great. Flush setting looks so good with your style.
I have to admit...I really enjoyed the part about "smashing a stone" out of the original setting. I think that was the most fun part! I'm a new follower and just catching up on your blog (referred from Kerin Rose)
aw, thanks Jenn! You should try it - its very fun!!
I like the setting! It looks lovely! I think it suits your style!
thanks zable! i've been wanting to do some more like this - just thinking about it yesterday actually! Maybe this will give me the inspiration I need to actually do it!
Post a Comment